株の自動売買をしてみる:本番環境で買い注文を出す
auカブコム証券のkabuステーション®APIを利用して、株の自動売買にチャレンジしています。 買い注文が出来るかどうか、本番環境で試してみます。
# buy_executor.py

import os
import urllib.request
import json
import pprint
from src.order_constants import OrderConstants
from dotenv import load_dotenv

load_dotenv()


class BuyExecutor:

    def __init__(self, config, token):
        self.config = config
        self.token = token

    @property
    def order_details(self):
        return {
            'Password': os.getenv('ORDER_PASSWORD'),
            'Symbol': os.getenv('HJ'),
            'Exchange': 1,
            'SecurityType': OrderConstants.STOCK,
            'Side': OrderConstants.BUY,
            'CashMargin': OrderConstants.CASH,
            'DelivType': OrderConstants.DEPOSIT,
            'FundType': OrderConstants.PROTECTION,
            'AccountType': OrderConstants.SPECIFIC,
            'Qty': 100,
            'FrontOrderType': 20,
            'Price': ******,
            'ExpireDay': 20230908
        }

    def send_order(self):

        json_data = json.dumps(self.order_details).encode('utf-8')

        url = f"{self.config['URL']}sendorder"
        req = urllib.request.Request(url, json_data, method='POST')
        self.set_request_headers(req)
        try:
            with urllib.request.urlopen(req) as res:
                print(f"{self.order_details['Symbol']}の買い注文を出しました")
        except urllib.error.HTTPError as e:
            print(f"HTTPError: {e}")
            content = json.loads(e.read())
            pprint.pprint(content)
        except Exception as e:
            print(f"ExceptionError: {e}")

    def set_request_headers(self, req):
        req.add_header('Content-Type', 'application/json')
        req.add_header('X-API-KEY', self.token)
銘柄、数量、金額等がハードコーディングになっていますが、とりあえず今回は、注文できることが確認できればいいので、このまま指値で注文してみます。
# main.py

from src.buy_executor import BuyExecutor

if __name__ == '__main__':
    env, config = return_environment_from_args()
    token = read_token(env)

    buy_executor = BuyExecutor(config, token)
    buy_executor.send_order()
実行してみます。python main.py --env prod
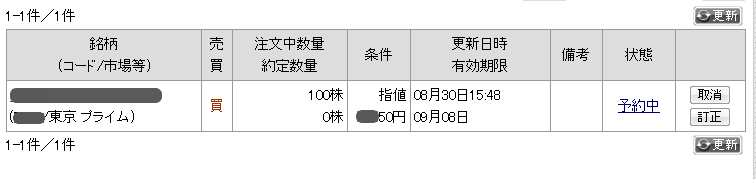
注文が出来ていることが確認できました。
株の自動売買をしてみる:買付余力を取得する
auカブコム証券のkabuステーション®APIを利用して、株の自動売買にチャレンジしています。 今回は、現金取引余力を取得してみます。
# cash_holding.py

import urllib.request
import json
import pprint
from dotenv import load_dotenv

load_dotenv()


class CashHolding:

    def __init__(self, config, token):
        self.config = config
        self.token = token

    def get_cash(self):

        url = f"{self.config['URL']}wallet/cash"
        req = urllib.request.Request(url, method='GET')
        req.add_header('Content-Type', 'application/json')
        req.add_header('X-API-KEY', self.token)

        try:
            with urllib.request.urlopen(req) as res:
                content = json.loads(res.read())
                return content['StockAccountWallet'] if self.config['env'] == 'prod' else 10000
        except urllib.error.HTTPError as e:
            print(e)
            content = json.loads(e.read())
            pprint.pprint(content)
        except Exception as e:
            print(e)
本番環境では実際の買付余力を、検証用の環境では10,000を出力するようにしています。
# main.py

from src.cash_holding import CashHolding

if __name__ == '__main__':
    env, config = return_environment_from_args()
    token = read_token(env)

    cash_holding = CashHolding(config, token)
    buying_power = cash_holding.get_cash()
    print(buying_power)
実行してみます。

上手く行きました。
ソースコード
株の自動売買をしてみる:検証用の環境で売り注文
auカブコム証券のkabuステーション®APIを利用して、株の自動売買にチャレンジしています。 買い注文を出すことができたので、次は売り注文を出して見ます。
kabuステーション API |株のことならネット証券会社【auカブコム証券】 を見ると、買い注文とアクセスポイントが一緒なので、 プロパティの売買の箇所を修正すればよさそうです。
SellOrderSenderクラスを実装する
# sell_order_sender.py

import os
import urllib.request
import json
import pprint
from dotenv import load_dotenv

load_dotenv()


class SellOrderSender:

    def __init__(self, config, token):
        self.config = config
        self.token = token

    @property
    def order_details(self):
        return {
            'Password': self.config['APIPassword'],
            'Symbol': os.getenv('NT'),
            'Exchange': 1,
            'SecurityType': 1,
            'Side': '1',
            'CashMargin': 1,
            'DelivType': 0,
            'FundType': '  ',
            'AccountType': 4,
            'Qty': 100,
            'FrontOrderType': 20,
            'Price': 1380,
            'ExpireDay': 0
        }

    def send_order(self):

        json_data = json.dumps(self.order_details).encode('utf-8')

        url = f"{self.config['URL']}sendorder"
        req = urllib.request.Request(url, json_data, method='POST')
        self.set_request_headers(req)
        try:
            with urllib.request.urlopen(req) as res:
                print(res.status, res.reason)
                for header in res.getheaders():
                    print(header)
                content = json.loads(res.read())
                pprint.pprint(content)
        except urllib.error.HTTPError as e:
            print(f"HTTPError: {e}")
            content = json.loads(e.read())
            pprint.pprint(content)
        except Exception as e:
            print(f"ExceptionError: {e}")

    def set_request_headers(self, req):
        req.add_header('Content-Type', 'application/json')
        req.add_header('X-API-KEY', self.token)
買い注文同様、売り注文もできました。 しかし、現物取引なので、持っていない株は売れません。 自分が対象銘柄の株を持っているかどうか確認します
対象銘柄の株を持っているかどうか確認する
残高照会 が使えそうです。
import urllib.request
import json
import pprint
import os
from dotenv import load_dotenv

load_dotenv()


url = f"{self.config['URL']}positions"
params = { 'product': 1 }
params['symbol'] = os.getenv('NT')
params['side'] = '2'
params['addinfo'] = 'true'
req = urllib.request.Request('{}?{}'.format(url, urllib.parse.urlencode(params)), method='GET')
req.add_header('Content-Type', 'application/json')
req.add_header('X-API-KEY', self.token)

try:
    with urllib.request.urlopen(req) as res:
        print(res.status, res.reason)
        for header in res.getheaders():
            print(header)
        print()
        content = json.loads(res.read())
        pprint.pprint(content)
except urllib.error.HTTPError as e:
    print(e)
    content = json.loads(e.read())
    pprint.pprint(content)
except Exception as e:
    print(e)
検証用の環境で実行すると、
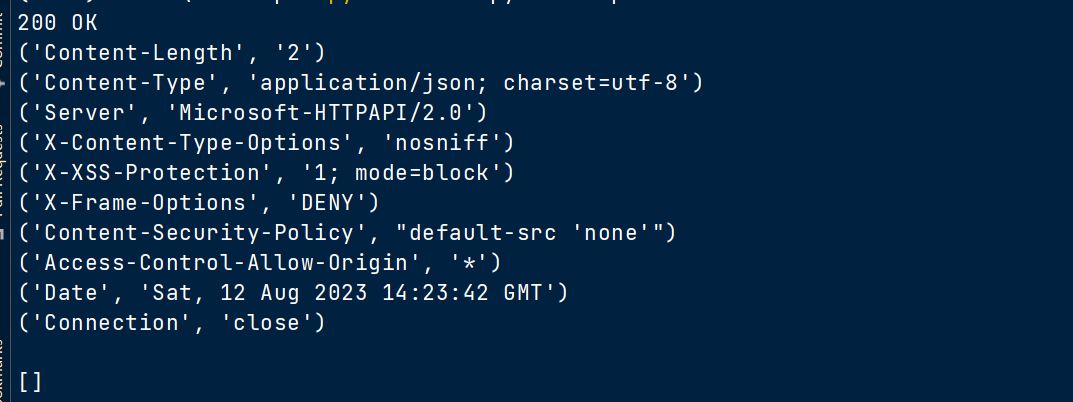
200 OKと共に空配列が返ってきているようです。
うーん。
検証用の環境で株を持っているということがあり得ないからでしょうか。
本番用の環境で実行してみると、
 上手く行きました。
# positions.py
(略)
       try:
            with urllib.request.urlopen(req) as res:
                content = json.loads(res.read())
                return content[0]['LeavesQty'] if self.config == 'ENV_PROD' else 100

(略)
検証用の環境で空配列を返されたら、テストできないので、
本番環境ではcontent[0]['LeavesQty']の値、検証用環境では100を返すようにします。
株を持っていたら売る。株を持っていなかったら買う
# main.py
(略)
if __name__ == '__main__':
    config = return_environment_from_args()
    token_manager = TokenManager(config)
    token = token_manager.fetch_token()

    positions = Positions(config, token)
    position_quantity = positions.get_positions()

    if position_quantity == 0:
        buy_order = BuyOrderSender(config, token)
        buy_order.send_order()
    else:
        sell_order = SellOrderSender(config, token)
        sell_order.send_order()

(略)
非常に単純なので、実際にこの条件で売買するわけにはいきませんが、 条件によって株を売ったり買ったりすることが出来ました。
ソースコード
# main.py
from src.token_manager import TokenManager
from src.buy_order_sender import BuyOrderSender
from src.sell_order_sender import SellOrderSender
from src.positions import Positions
from config import Config
import argparse


def return_environment_from_args():
    parser = argparse.ArgumentParser(description='Fetch API token')
    parser.add_argument('--env', choices=['test', 'prod'], default='test', help='Specify environment (test or prod)')
    args = parser.parse_args()
    return Config.ENV_TEST if args.env == 'test' else Config.ENV_PROD


if __name__ == '__main__':
    config = return_environment_from_args()
    token_manager = TokenManager(config)
    token = token_manager.fetch_token()

    positions = Positions(config, token)
    position_quantity = positions.get_positions()

    if position_quantity == 0:
        buy_order = BuyOrderSender(config, token)
        buy_order.send_order()
    else:
        sell_order = SellOrderSender(config, token)
        sell_order.send_order()


# positions.py
import urllib.request
import json
import pprint
import os
from dotenv import load_dotenv

load_dotenv()


class Positions:
    def __init__(self, config, token):
        self.config = config
        self.token = token

    def get_positions(self):
        url = f"{self.config['URL']}positions"
        params = {
            'product': '1',
            'symbol': os.getenv('NT'),
            'side': '2',
            'addinfo': 'true'
        }
        req = urllib.request.Request('{}?{}'.format(url, urllib.parse.urlencode(params)), method='GET')

        req.add_header('Content-Type', 'application/json')
        req.add_header('X-API-KEY', self.token)

        try:
            with urllib.request.urlopen(req) as res:
                content = json.loads(res.read())
                return content[0]['LeavesQty'] if self.config == 'ENV_PROD' else 0
        except urllib.error.HTTPError as e:
            print(e)
            content = json.loads(e.read())
            pprint.pprint(content)
        except Exception as e:
            print(e)
株の自動売買をしてみる:検証用の環境で買い注文
auカブコム証券のkabuステーション®APIを利用して、株の自動売買にチャレンジしています。 トークンの発行ができたので、次は検証用の環境で買い注文を出してみます
目次
サンプルコードを実行する
サンプルコードをそのまま実行する
kabuステーション API |株のことならネット証券会社【auカブコム証券】のサンプルコードのPassword、URL、API_KEYだけを変更してみました。
# kabusapi_sendorder_cash_buy.py
import os
import urllib.request
import json
import pprint
from dotenv import load_dotenv

load_dotenv()

obj = {'Password': os.getenv('ORDER_PASSWORD'),
       'Symbol': '9404',
       'Exchange': 1,
       'SecurityType': 1,
       'Side': '2',
       'CashMargin': 1,
       'DelivType': 2,
       'FundType': '02',
       'AccountType': 4,
       'Qty': 100,
       'FrontOrderType': 20,
       'Price': 1380,
       'ExpireDay': 0
       }
json_data = json.dumps(obj).encode('utf-8')

url = 'http://localhost:18081/kabusapi/sendorder'
req = urllib.request.Request(url, json_data, method='POST')
req.add_header('Content-Type', 'application/json')
req.add_header('X-API-KEY', '****************************')

try:
    with urllib.request.urlopen(req) as res:
        print(res.status, res.reason)
        for header in res.getheaders():
            print(header)
        print()
        content = json.loads(res.read())
        pprint.pprint(content)
except urllib.error.HTTPError as e:
    print(e)
    content = json.loads(e.read())
    pprint.pprint(content)
except Exception as e:
    print(e)
APIの仕様を確認しながら、必要事項を設定していきます。
Password:注文パスワードは.envから読み込めるようにします。Symbol:銘柄コードです。手元の四季報の最初に載っていた日本テレビにしてみますExchange:市場コードは東証なので1SecurityType:商品種別は株式で1Side:買う方なので2CashMargin:信用区分は現物なので1DelivType:受渡区分は預り金なので2FundType:資産区分は担保差し入れはないので02※https://faq.kabu.com/s/article/k000178AccountType:口座種別は特定口座なので4Qty:数量に単元株数の100FrontOrderType:執行条件はとりあえず指値の20Price:注文金額ExpireDay:注文有効期限は今日中で0URLとAPI-KEYをとりあえずハードコーディングしておきます。
実行
python kabusapi_sendorder_cash_buy.py
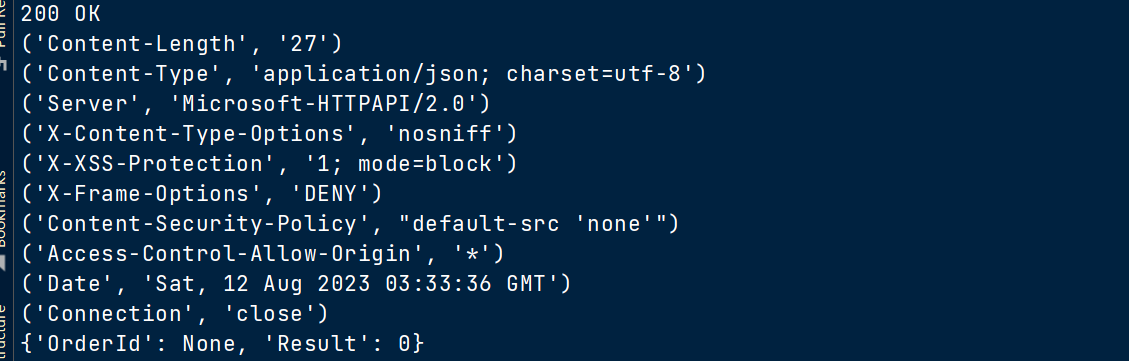
結果

200 OKが返ってきていて、Resultが0なので、成功しているようです。
OrderIdがNoneなのは、検証用の環境だからでしょう。
URL、API_KEYをconfigから読み込む
main.pyで引数を受け取って、検証用環境と本番環境を切り替えて買い注文を出せるようにします
# main.py
def return_environment_from_args():
    parser = argparse.ArgumentParser(description='Fetch API token')
    parser.add_argument('--env', choices=['test', 'prod'], default='test', help='Specify environment (test or prod)')
    args = parser.parse_args()
    return Config.ENV_TEST if args.env == 'test' else Config.ENV_PROD

if __name__ == '__main__':
    config = return_environment_from_args()
    token_manager = TokenManager(config)

    buy_order = BuyOrderSender(config)
    buy_order.send_order()


# buy_oder_dener.py
class BuyOrderSender:
    def __init__(self, config):
        self.config = config

    @property
    def order_details(self):
        return {
            'Password': self.config['APIPassword'],
    (略)

 def send_order(self):
        json_data = json.dumps(self.order_details).encode('utf-8')
        url = f"{self.config['URL']}sendorder"
    (略)
TOKENをtoken_manager.pyから受け取る
ハードコーディングしているTOKENをtoken_manager.pyから受け取れるようにします。
# main.py
if __name__ == '__main__':
    config = return_environment_from_args()
    token_manager = TokenManager(config)
    token = token_manager.fetch_token()

    buy_order = BuyOrderSender(config, token)
    buy_order.send_order()
tokenを発行して、BuyOrderSenderクラスに渡します。
# buy_oder_sender.py

     def __init__(self, config, token):
        self.config = config
        self.token = token

    def send_order(self):
    (略)

     def set_request_headers(self, req):
        req.add_header('Content-Type', 'application/json')
        req.add_header('X-API-KEY', self.token)
実行結果
上手く行きました。次は売り注文を出してみます。
ソースコード
# main.py
from src.token_manager import TokenManager
from src.buy_oder_sender import BuyOrderSender
from config import Config
import argparse


def return_environment_from_args():
    parser = argparse.ArgumentParser(description='Fetch API token')
    parser.add_argument('--env', choices=['test', 'prod'], default='test', help='Specify environment (test or prod)')
    args = parser.parse_args()
    return Config.ENV_TEST if args.env == 'test' else Config.ENV_PROD


if __name__ == '__main__':
    config = return_environment_from_args()
    token_manager = TokenManager(config)
    token = token_manager.fetch_token()

    buy_order = BuyOrderSender(config, token)
    buy_order.send_order()

# buy_oder_sender.py
import os
import urllib.request
import json
import pprint
from dotenv import load_dotenv

load_dotenv()


class BuyOrderSender:

    def __init__(self, config, token):
        self.config = config
        self.token = token

    @property
    def order_details(self):
        return {
            'Password': self.config['APIPassword'],
            'Symbol': os.getenv('NT'),
            'Exchange': 1,
            'SecurityType': 1,
            'Side': '2',
            'CashMargin': 1,
            'DelivType': 2,
            'FundType': '02',
            'AccountType': 4,
            'Qty': 100,
            'FrontOrderType': 20,
            'Price': 1380,
            'ExpireDay': 0
        }

    def send_order(self):

        json_data = json.dumps(self.order_details).encode('utf-8')

        url = f"{self.config['URL']}sendorder"
        req = urllib.request.Request(url, json_data, method='POST')
        self.set_request_headers(req)
        try:
            with urllib.request.urlopen(req) as res:
                print(res.status, res.reason)
                for header in res.getheaders():
                    print(header)
                content = json.loads(res.read())
                pprint.pprint(content)
        except urllib.error.HTTPError as e:
            print(f"HTTPError: {e}")
            content = json.loads(e.read())
            pprint.pprint(content)
        except Exception as e:
            print(f"ExceptionError: {e}")

    def set_request_headers(self, req):
        req.add_header('Content-Type', 'application/json')
        req.add_header('X-API-KEY', self.token)
株の自動売買をしてみる:トークンを発行する
auカブコム証券には、株取引用のAPI「kabuステーション®API」
が用意されています。 このAPIを利用して株の自動売買に挑戦してみようと思います。
環境
設定
auカブコム証券に口座を開設し、 https://kabucom.github.io/kabusapi/ptal/howto.html にしたがってkabuステーションの設定をします。
サンプルコードでトークンを発行してみる
ここにサンプルコードがあったので、そのまま利用してトークンを発行してみます
# kabusapi_token.py
import urllib.request
import json
import pprint

obj = { 'APIPassword': 'testtest' }
json_data = json.dumps(obj).encode('utf8')

url = 'http://localhost:18081/kabusapi/token'
req = urllib.request.Request(url, json_data, method='POST')
req.add_header('Content-Type', 'application/json')

try:
    with urllib.request.urlopen(req) as res:
        print(res.status, res.reason)
        for header in res.getheaders():
            print(header)
        print()
        content = json.loads(res.read())
        pprint.pprint(content)
except urllib.error.HTTPError as e:
    print(e)
    content = json.loads(e.read())
    pprint.pprint(content)
except Exception as e:
    print(e)
検証用の環境で試したいので、検証用APIPasswordを設定し、urlもurl = 'http://localhost:18081/kabusapi/token'にします。
$ python kabusapi_token.pyで実行すると、

ステータスコードと、ヘッダー情報とともにTokenが返ってきていることがわかります。
※検証用の環境とはいえ、Tokenは一部のみ表示しています。
トークンの取得が成功しました。 このトークンを使って、売買していきますが、その前に、このコードを呼び出し易いようにしておきます。
main.pyからTokenManagerクラスを呼び出す
Pythonぽく、main.pyからソースコードを呼び出すようにします。
# main.py
from src.token_manager import TokenManager

if __name__ == '__main__':
    TokenManager.fetch_token()
Tokenを管理するクラスを用意します
# token_manager.py
import urllib.request
import json


class TokenManager:
    @staticmethod
    def fetch_token():
        obj = {'APIPassword': 'testtest'}
        json_data = json.dumps(obj).encode('utf8')

        url = 'http://localhost:18081/kabusapi/token'
        req = urllib.request.Request(url, json_data, method='POST')
        req.add_header('Content-Type', 'application/json')

        try:
            with urllib.request.urlopen(req) as res:
                content = json.loads(res.read())
                print(content['Token'])
        except urllib.error.HTTPError as e:
            content = json.loads(e.read())
            print(content)
        except Exception as e:
            print(e)

        return None
コマンドライン引数を使用して実行する
本番用と検証用の環境を簡単に切り替えたいので、 コマンドライン引数で環境を指定してスクリプトを実行できるようにしてみます
# config.py

class Config:
     ENV_TEST = {
        'APIPassword': 'testtest',
        'URL': 'http://localhost:18081/kabusapi/token'
    }
    ENV_PROD = {
        'APIPassword': '********',
        'URL': 'http://localhost:18080/kabusapi/token'
    }
設定ファイルを用意しました。
# main.py
from src.token_manager import TokenManager
import argparse

parser = argparse.ArgumentParser(description='Fetch API token')
parser.add_argument('--env', choices=['test', 'prod'], default='test', help='Specify environment (test or prod)')
args = parser.parse_args()

if __name__ == '__main__':
    TokenManager.fetch_token(args.env)
コマンドライン引数で、検証用と本番用の環境を切り替えて実行できるようにします。 開発中なので、デフォルトは検証用の環境にしました。
# テスト環境でのトークン取得
$ python main.py --env test

# 本番環境でのトークン取得
$ python main.py --env prod
次は検証用の環境で発注をしてみようと思います。